Query Studio/ Report Studio
Report Example: Timesheets Status List Report
|
This example walks you through creating a report using the
Timesheets folder. This report shows timesheet statuses for users in the
enterprise. This example uses Query Studio, but the concepts are the
same for Report Studio.
To create a Timesheet Status report:
- In the Reports application,
on the tab toolbar, click Open Query Studio.
What Happens: Query Studio opens in a new window, with a blank
report in the right pane and a menu in the left pane.
Note: If the Presentation group is not visible, refresh the
Query Studio window.
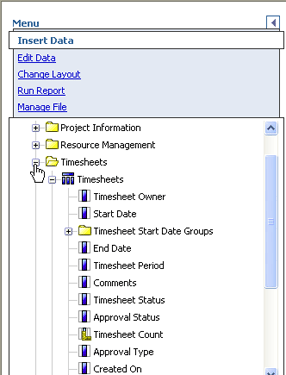
- With Insert
Data selected (the default), open the Presentation
group and expand the Timesheets
folder:

Note: All data used in this example will come from the Timesheets
folder. If you use data from multiple folders in a report, your results
may be unpredictable.
- Expand the Timesheets
query subject and double-click the Approval
Status query item.
- Query subjects are indicated
by the icon
 and query items are indicated with the icon
 . For more information about the icons in the Presentation
Data Model, see .
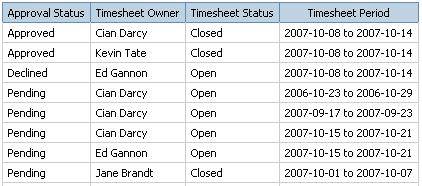
What Happens: An
Approval Status column is added to your report.
Note: You can also drag and drop query items to a report (drag
and drop will not work in Firefox).
- Double-click the Timesheet Owner query item to add project
name to the report.
What Happens: A Timesheet Owner column is added to the report
and timesheet owner values duplicate if there are multiple projects of
any one project type.
- Repeat step 5 for Timesheet Status and Timesheet
Period.

You can group the data to make it easier to read.
- Click on the Approval
Status column and click the Group
icon
 .
.
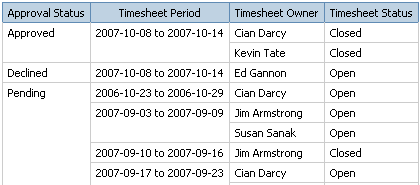
What Happens: The Approval Status column is now grouped and
duplicate rows are removed.
- Repeat step 7 for Timesheet Status and Timesheet
Period.
This groups both columns to remove duplicate rows and makes the report
more readable.

- Give the report a title
by clicking on the Title text.
- Save the report by clicking
the Save icon
 .
.
Related Topics:


