Report Studio

Report Example: Project Budget List Report with Chart


This example walks you through creating a Project Budget report from the Project Information folder which is grouped by Project Owner. This example is for Report Studio, but the concepts are the same when using Query Studio.

Note: The example assumes you have access to Report Studio and that you have projects with specific budget values.

Important: You should use data from only one top-level folder in any given report. Do not combine data from more than one grouping.

To Create A Project Budget Report:

  1. In the Reports application, on the tab toolbar, click Open Report Studio.
    What Happens:
    Report Studio opens in a new window.

    Note:
    If the Presentation group is not visible, refresh the Query Studio window.
  2. Click New.
  3. From the report list, select List.
    What Happens:
    The List Report pane appears
  4. From the Insertable Objects pane expand the Presentation Package.
  5. Expand the Project Information folder.
  6. Expand the Projects query subject

    Query subjects are indicated by the icon and query items are indicated with the icon. For more information about the icons in the Presentation Data Model, see Reports Data Model Icons.
  7. Drag and Drop or double click Owner Full Name.

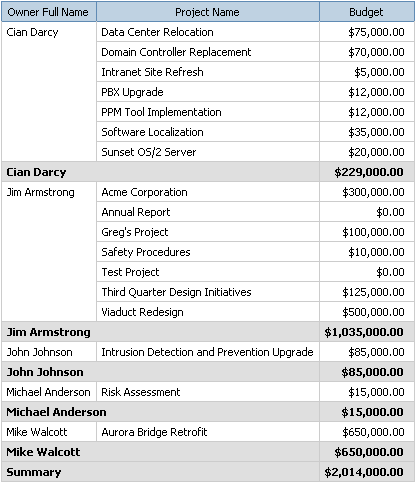
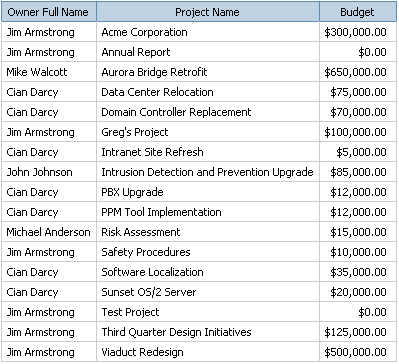
    What Happens:
     An Owner Full Name column is added to your report.
    Note:
    You can also drag and drop query items to a report (drag and drop will not work in Firefox).
     
  8. Drag and Drop or double click Project Name.
    What Happens:
     A Project Name column is added to your report.
  9. Expand the Project Financials folder.
  10. Drag and Drop or double click Budget.
    What Happens:
     A Budget column is added to your report.
  11. Run the report to see the basic information.


  12. Click on the Owner Full Name column title and click on the Group icon .
    What Happens:
     Duplicate project owners are removed from your report.
  13. This will group all projects by owners.
  14. Click the Budget column title.
  15. Click the Aggregate icon .
  16. Select Total.
    What Happens:  
    A running total of budgets is added to your report.
     
  17.  Run the report. You will see that there are totals for each owner and a summary total for all projects.


  18. Give the report a name by double clicking on the Title text item and typing “Project Budgets by Owner”.
  19. Click the Save icon .
  20. Select a location for the report.
  21. In the Name field type “Project Budgets by Owner”.
  22. Click Save

Your report is now saved in the location you chose; you can run it from there, add it to your dashboard report viewer or edit it.


You can also easily add a chart to show graphically how many hours are required for each project for each month.

To Add A Chart to the Project Budget report:

  1. From the Insertable Objects pane, click on the Toolbox tab.
  2. Drag and Drop Chart to before the list (this will assure it displays at the top of the page).
  3. From the Chart group menu select Pie, Donut.
  4. From the Chart Type menu, select Pie with 3-D Visual Effect.
  5. Click OK.
  6. From Project Financials, drag and drop Budget into the Measure: field in the chart.
  7. From Projects, drag and drop Project Name to Pie Slices:
  8. Optional: From Projects drag and drop Project Type to Pies.
    This will give a separate chart for each Project Type.

    The Chart should look like this:


  9. Run the Report by clicking Run Report.


Related Topics: