Report Studio
Report Example: Resource Requirements Crosstab Report with Chart
|
This example walks you through creating a Resource Requirements
crosstab report. This example is for Report Studio, but
the concepts are the same when using Query Studio.
Note: The example
assumes you have access to Report Studio and that you
have projects with resource requirements
Important:
Work down in the Resource Management data structure in order to get consistent
and logical results. Query subjects are nested logically and related to
one another based on the structure of the folder.
Important:
You should use data from only one top-level folder in any given report.
Do not combine data from more than one grouping.
To Create a Resource Requirement Report:
- In the Reports application,
on the tab toolbar, click Open Report Studio.
What Happens: Report Studio opens in a new window.
Note: If the Presentation group is not visible, refresh the
Query Studio window.
- Click New
 .
.
- From the report list, select
Crosstab.
What Happens: The Crosstab Report pane appears
- From the Insertable
Objects pane expand the Presentation
Package.
- Expand the Resource
Management folder.
- Expand the Resource
Management Date Groups query subject.
- Drag and Drop Resource
Month to Columns
What Happens: A
Resource Month column is added to your report.
Note: You can also drag and drop query items to a report (drag
and drop will not work in Firefox).
- Expand the Requirements
query subject.
- Drag and Drop Project
Name to Rows.
What Happens: Project
Name is added to the rows in your report.
- Drag and Drop Requirement
Hours to Measures
What Happens: Requirement
Hours is added to your report as the measure.

- Run the report.
- To add a summary of hours
for each column and row, select the Crosstab
Intersection cells and click the Aggregate
icon.
- Select Total.
What Happens: Summaries for all columns are added to the report.

- Run the report
You can also easily add a chart to show graphically how
many hours are required for each project for each month.
To Add A Chart to the Resource Requirements report:
- From the Insertable
Objects pane, click on the Toolbox
tab.
- Drag and Drop Chart
to before the crosstab (this will assure it displays at the top of the
page).
- Select Column
- Select Column
with 3-D Visual Effect.
- Click on the Source
tab
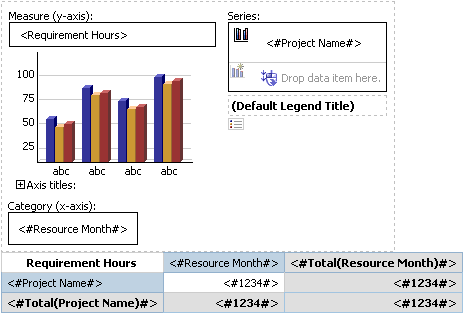
- Drag and Drop Resource
Month to Category (x-axis).
What Happens: Resource
Month is added to your report as the measure on the y-axis.
- Drag and Drop Project
Name to Series.
What Happens: Project
Name is added as the series for the report.
- Drag and Drop Requirement
Hours to Measure (y-axis).
What Happens: Requirement
Hours is added to your report as the category on the x-axis.
- Run the report.
- The data is now accompanied
by a chart
- Click the Save
icon
 .
.
- Select a location for the
report.
- In the Name
field type "Resource Requests by Month".
- Click Save
Related Topics: